|
Document purpose: This step-by-step guide walks you through processing the superannuation creditor payment in FOXPRO after running Payslips UPDATE. This is the second part of the Payday Super pay run process. Related guide: Payday Super — System Changes Guide |
1. Before You Begin
Before processing the superannuation creditor payment, confirm the following have already been completed for this pay run:
- ✅ Payslips have been processed (Automatic or Manual Payslips)
- ✅ Payslips UPDATE (PY011) has been run with Export Superannuation = Yes
- ✅ The Payslips UPDATE PDF has been saved
- ✅ The MessageXchange STP confirmation (200 OK) has been received
- ✅ The superannuation export CSV file has been saved ready for upload to your clearing house
⚠️ Important: For the AP creditor payment to generate correctly, the superannuation fund's creditor code must have been added to the Superannuation Schemes screen (PYM09) before Payslips UPDATE was run for this pay run.
⚠️Important: When paying via PayID, the creditor's payment method must be set to Direct Debit (D/Deb). ABA files are not compatible with PayID.
⚠️Important: If you AP module is not in the current month the A/P Invoice will sit in A/P entry to be updated once you roll into the current month.
See: Payday Super — System Changes Guide Section
2. Select Your Superannuation Creditor
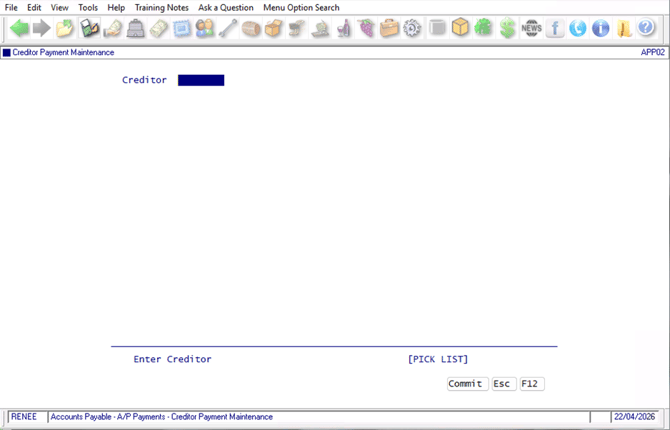
- Navigate to Accounts Payable > A/P Payments > Creditor Payment Maintenance (program APP02).
-
- In the Creditor field, type your superannuation fund creditor code, or click [PICK LIST] to search for and select the creditor from the list.
- Press Commit to load the creditor's payment details.
💡 Tip: Use the [PICK LIST] option if you are unsure of the creditor code — this will display all creditors available in your system.
3. Review & Enter the Payment Amount
Once the creditor is selected, the screen will preload all outstanding invoices for that creditor. As superannuation must be paid at the same time as wages, you should see only one invoice listed here for the current pay run.
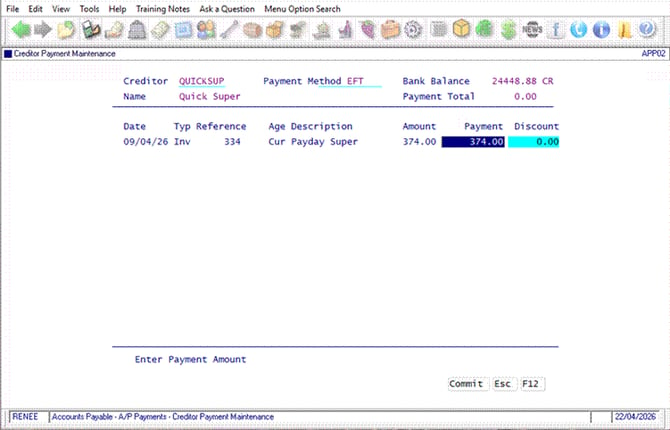
The screen will display the following details:
|
Field |
Description |
|
Creditor |
The superannuation fund creditor code and name (e.g. QUICKSUP — Quick Super) |
|
Payment Method |
Will be the payment method on the Creditor File |
|
Bank Balance |
Your current bank balance |
|
Payment Total |
Will update as you enter the payment amount |
|
Date |
The date the invoice was raised (your pay run date) |
|
Type |
Inv (Invoice) |
|
Reference |
The payslip batch number |
|
Description |
Payday Super |
|
Amount |
The superannuation amount calculated in the pay run |
|
Payment |
Enter the full amount here to confirm payment amount |
In the Payment field, enter the full amount shown in the Amount column to confirm you are paying the full superannuation liability for this pay run, then press Commit.
After committing the payment, press Commit then Esc to close the Creditor Payment Maintenance screen.
⚠️ It is not recommended to process a partial payment of superannuation. Paying less than the full amount will mismatch the export file and payment, delaying processing & risking ATO compliance issues.
4. Review the Creditor Payment Listing (APP03)
Navigate to Accounts Payable > A/P Payments > Creditor Payment Listing (program APP03).
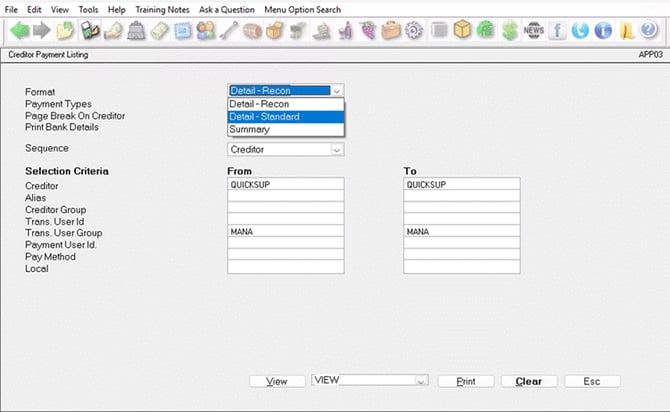
This report allows you to review and verify the payment before it is processed. There are three report formats available — select Detail Recon, which will display the GL postings for the payment so you can confirm the figures are correct.
Select your superannuation fund creditor and click View to generate the PDF.
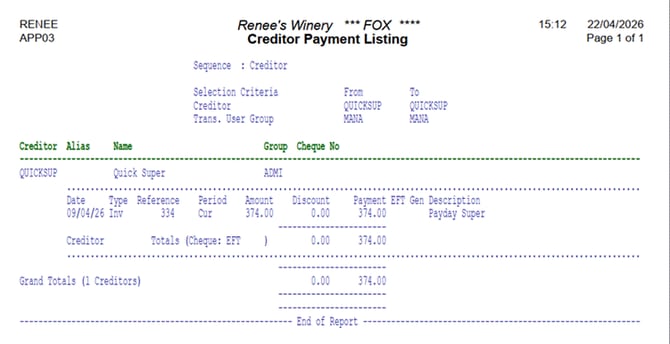
Review the report carefully to confirm you are paying the correct amount before proceeding.
💡 Tip: Whilst it is possible to process payments for multiple creditors at the same time through this process, it is recommended that the Superannuation be paid in one stand alone batch.
5. Print the Creditor Remittance (APP06) — if required
ℹ️ Note: This step is mandatory if the system parameter `Acc/Pay: Must Print Remit. Before Update` is set to `Yes` at your site — when this parameter is enabled, the Creditor Remittance must be printed before the payment can be updated.
If the parameter is set to No, this step is optional but recommended as a record of the payment, before proceeding to Section 6 — Update the Payment.
To check this parameter: Navigate to System Administration > System Parameters (program SYS02), set the Parameter Group to Accounts Payable, and locate the parameter Acc/Pay: Must Print Remit. Before Update.
Whether this parameter is set to Yes or No is a company decision — please consult with your team management before making any change.
Navigate to Accounts Payable > A/P Payments > Creditor Remittance Print
In the Selection Criteria section, enter your superannuation fund creditor code in both the From and To Creditor fields (e.g. QUICKSUP to QUICKSUP) so the remittance is generated for this creditor only.
Leave the remaining selection criteria fields (Alias, Creditor Group, Trans. User Id, Trans. User Group, Payment User Id, Pay Method, Local) blank.
Click View to preview the remittance or Print to print it directly.
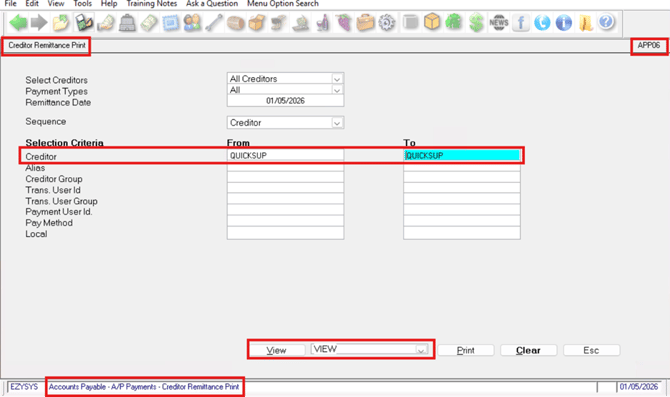
Confirm the following fields are set correctly for this pay run:
|
Field |
Description |
|
Select Creditors |
Set to All Creditors |
|
Payment Types |
Set to All unless restricting by payment type |
|
Remittance Date |
The remittance date — typically the pay run date (e.g. 01/05/2026) |
|
Sequence |
Set to Creditor |
💡 Tip: It is good practice to View the remittance first to confirm the details are correct before printing.
6. Update the Payment
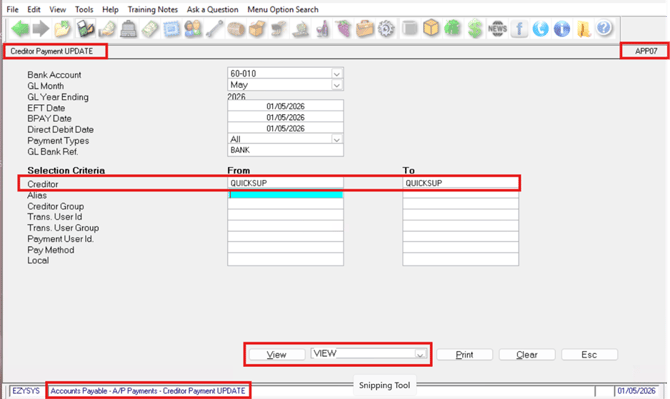
Once you have reviewed and confirmed the figures on the Creditor Payment Listing (and printed the remittance if required), navigate to Accounts Payable > A/P Payments > Creditor Payment UPDATE (program APP07) to update the payment.
In the Selection Criteria section, enter your superannuation fund creditor code in both the From and To Creditor fields (e.g. QUICKSUP to QUICKSUP). This restricts the update to only this creditor's payment.
Leave the remaining selection criteria fields (Alias, Creditor Group, Trans. User Id, Trans. User Group, Payment User Id, Pay Method, Local) blank.
Confirm the following fields are set correctly for this pay run:
|
Field |
Description |
|
Bank Account |
The GL bank account code that represents the bank account the payment will be drawn from (e.g. 60-010) |
|
GL Month |
The GL period the payment will post to (e.g. Apr) |
|
GL Year Ending |
The GL year (e.g. 2026) |
|
EFT Date |
The date the EFT will be processed — typically the pay run date |
|
BPAY Date |
The BPAY processing date — typically the pay run date |
|
Direct Debit Date |
The direct debit date — typically the pay run date |
|
Payment Types |
Set to All unless you need to restrict by payment type |
|
GL Bank Ref. |
The reference that will appear in the GL ledger (e.g. on the GLR07 ledger report) against the bank account transaction. It should represent the payment method used — for example EFT, BPAY, BANK (for cheque) or DD (for direct debit) — so the payment type can be identified at a glance when reviewing the GL. |
Click View to generate the payment update.
💡 Tip: It is good practice to View the remittance first to confirm the details are correct before printing.
💡 Tip — GL Bank Ref.: Set the GL Bank Ref. consistently for each payment method (e.g. always use EFT for EFT payments, BPAY for BPAY payments, BANK for cheques, DD for direct debits). When you review the bank account in the GL Ledger (program GLR07), the reference appears against each transaction so you can quickly distinguish payment types.
💡 Tip: Setting both From and To to the same creditor code ensures only this single payment is included in the update — preventing any other pending creditor payments from being processed in the same batch.
⚠️ Important: Review the preview carefully to confirm the bank account, dates, GL period and payment amount are all correct before proceeding with the update.
Once you have confirmed all details are correct, complete the update.
Click View to generate the payment update.
After a successful update, the Creditor Payment UPDATE report will be generated showing the posted payment details.
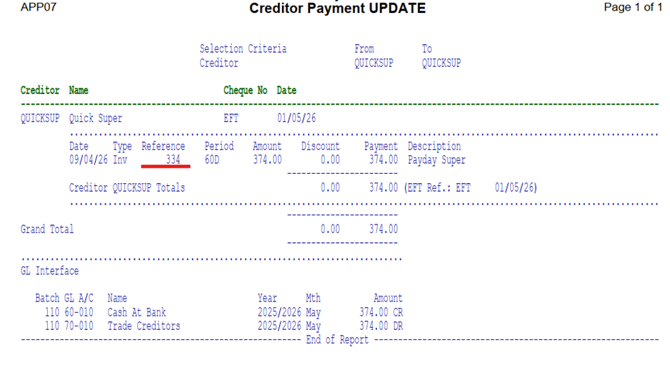
The report will include:
|
Section |
What it shows |
|
Header |
Creditor (e.g. QUICKSUP — Quick Super), Cheque No (EFT), Date |
|
Transaction line |
Date, Type, Reference (the payroll batch number), Period, Amount, Discount, Payment, Description (Payday Super) |
|
Creditor Totals |
Total payment amount and EFT Ref. with payment date |
|
Grand Total |
Overall total of the update |
|
GL Interface |
The GL postings — Cash At Bank (CR) and Trade Creditors (DR) for the relevant GL period |
💡 Tip: The Reference field on the transaction line is the payroll batch number that this superannuation payment relates to. Make a note of this number — it links the payment back to its originating payroll batch for your records.
💡 Tip: The Reference field on the transaction line is the payroll batch number that this superannuation payment relates to. Make a note of this number — it links the payment back to its originating payroll batch for your records.
7. Generate the EFT File (APP12) — EFT creditors only
💡 Tip: The Reference field on the transaction line is the payroll batch number that this superannuation payment relates to. Make a note of this number — it links the payment back to its originating payroll batch for your records.
After the payment has been successfully updated in APP07, you can generate the EFT file ready for upload to your bank.
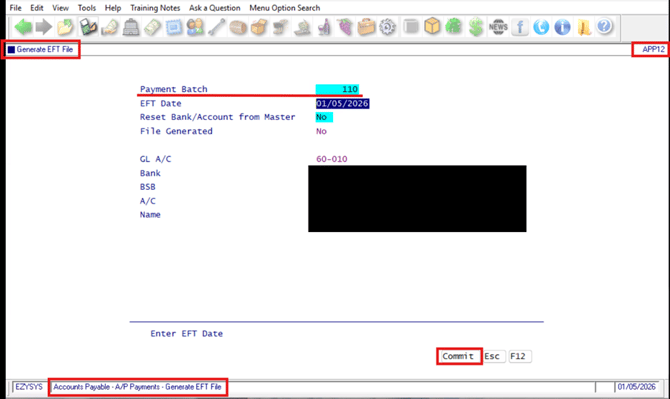
- Navigate to Accounts Payable > A/P Payments > Generate EFT File (program APP12).
- In the Payment Batch field, enter (or select) the batch number from the APP07 update — for example, batch 110 from the Creditor Payment UPDATE report.
- Ensure the EFT Date is set to today's date (or a future date if the payment is being forward-dated).
Confirm or enter the following fields:
|
Field |
Description |
|
Payment Batch |
The payment batch number generated by the APP07 update (this matches the Batch number shown on the Creditor Payment UPDATE report — e.g. 110) |
|
EFT Date |
The date the bank will process the EFT — must be the current date (today) or a future date. The bank will reject the EFT file if the date is in the past. |
|
Reset Bank/Account from Master |
Determines which set of bank details the EFT file uses. When the creditor payment was updated in APP07, the bank, branch and account number on the creditor at that point in time were written to the payment record. Set to No to use those stored details from the update, or set to Yes to use the current bank details on the creditor master record instead. |
|
File Generated |
Will display No before the file is generated, and update once the EFT file has been created |
💡 Tip: Leave Reset Bank/Account from Master as No in normal pay runs. Only set it to Yes if the creditor's bank details have changed since the payment was updated in APP07 and you want the new details to apply to the EFT file.
The screen will also display the bank account details that the EFT file will draw from — confirm these match the bank account you used in APP07:
- GL A/C — the GL account code for the bank account (e.g. 60-010)
- Bank — the bank short name
- BSB — the bank BSB number
- A/C — the account number
- Name — the account name
⚠️ Important: Carefully verify the GL A/C, BSB, A/C and Name match the correct paying bank account before proceeding. Generating an EFT file against the wrong bank account will cause the payment to fail or draw from the incorrect account.
⚠️ EFT Date warning: If the EFT Date entered is earlier than today, FOXPRO will display a warning. Do not proceed with a back-dated EFT date — the bank will reject the EFT file when uploaded. Always set the EFT Date to today's date (or a future date) before committing.
Press Commit to generate the EFT file.
Saving the EFT File
When you press Commit, FOXPRO will open a Windows Save As dialog so you can choose where to save the EFT file ready for upload to your bank.
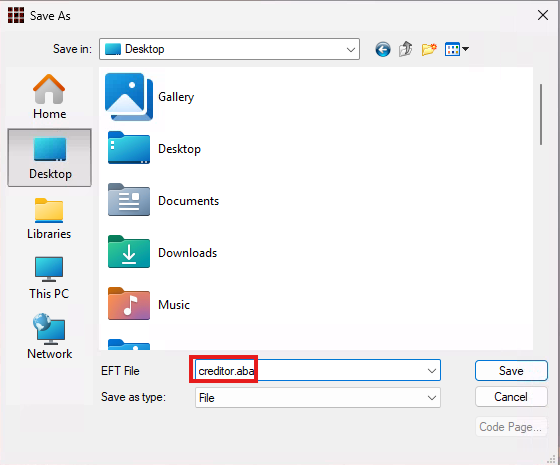
- Navigate to your usual EFT / banking folder (or the location your finance team uses for bank upload files).
- Confirm & change the EFT File name — the default is creditor, but you may wish to rename it to include the date or batch number for easier identification (e.g. creditor_superannuation_010526).
⚠️ You must include the file extension of. aba on the end of the file name - Leave Save as type as File.
- Click Save.
- Navigate to Accounts Payable > A/P Payments > Generate BPAY File (program APP19).
- In the Payment Batch field, enter the batch number from the APP07 update — or click [PICK LIST] to select from the available batches.
- Ensure the BPAY Date is set to today's date (or a future date if the payment is being forward-dated).
The EFT file is now saved and ready to be uploaded to your bank.
💡 Tip: Make a note of the file name and location — you will need this when you log into your bank's portal to upload the file.
🔒 Cyber-safety reminder: EFT files contain bank account details and payment instructions and can be used to authorise real money transfers. Always:
• Save EFT files to a restricted-access folder (not the Desktop or a shared drive accessible to everyone)
• Never email EFT files
• Delete the file from your local machine once the bank has confirmed the payment has been processed
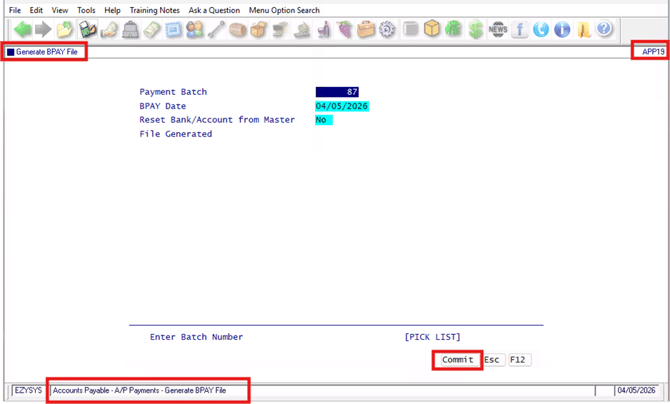
8. Generate the BPAY File (APP19) — BPAY creditors only
The Generate BPAY File process follows the same flow as Generate EFT File (APP12).
After the creditor payment update has been successfully updated in APP07, you can generate the BPAY file ready for upload to your bank.
- Navigate to Accounts Payable > A/P Payments > Generate BPAY File (program APP19).
- In the Payment Batch field, enter the batch number from the APP07 update — or click [PICK LIST] to select from the available batches.
- Ensure the BPAY Date is set to today's date (or a future date if the payment is being forward-dated).
|
Field |
Description |
|
Payment Batch |
The payment batch number from the APP07 update — use [PICK LIST] if you need to look it up |
|
BPAY Date |
The date the bank will process the BPAY payment — must be the current date (today) or a future date. The bank will reject the file if the date is in the past. |
|
Reset Bank/Account from Master |
Same behavior as APP12 — leave as No in normal pay runs. See Section 7 for the full explanation. |
|
File Generated |
Will display No before the file is generated, and update once the BPAY file has been created |
⚠️ BPAY Date warning: As with the EFT process, FOXPRO will display a warning if the BPAY Date is earlier than today. Do not proceed with a back-dated BPAY date — the bank will reject the file when uploaded.
Press Commit to generate the BPAY file.
FOXPRO will open a Windows Save As dialog so you can choose where to save the BPAY file ready for upload to your bank — follow the same saving steps and naming conventions as for the EFT file (see Saving the EFT File in Section 7).
⚠️ BPAY Date warning: As with the EFT process, FOXPRO will display a warning if the BPAY Date is earlier than today. Do not proceed with a back-dated BPAY date — the bank will reject the file when uploaded.
9. Verify the Batch — EFT Listing (APP13) / BPAY Listing (APP21)
A verification listing is available for both EFT and BPAY batches:
- EFT creditors: use the EFT Listing report
- BPAY creditors: use the BPAY Listing report
Both reports serve the same purpose: they show the payment details for each entry in the batch you are paying, including the BSB / biller code, account / reference, amount, payee name and reference, so you can confirm the file is correct before (or after) uploading it to the bank.
Navigate to Accounts Payable > A/P Payments > EFT Listing (APP13) or BPAY Listing (APP21) and select the batch you wish to verify.
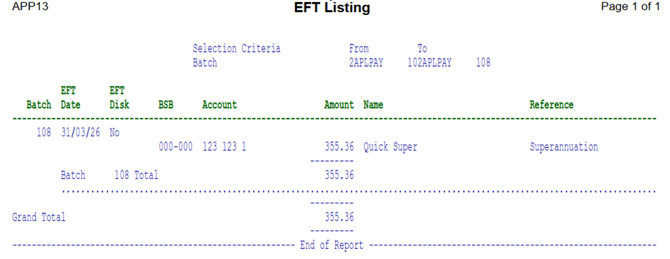
The report displays the following columns:
|
Column |
Description |
|
Batch |
The payment batch number |
|
EFT Date |
The EFT processing date set in APP12 |
|
EFT Disk |
Indicates whether the EFT file has been generated (Yes) or not yet generated (No) |
|
BSB |
The destination BSB (the superannuation fund / clearing house bank) |
|
Account |
The destination account number |
|
Amount |
The payment amount |
|
Name |
The payee name (e.g. Quick Super) |
|
Reference |
The reference that will appear on the bank statement (e.g. Superannuation) |
The report also displays a Batch Total and Grand Total so you can confirm the total amount matches the figures from the Creditor Payment UPDATE report.
💡 Tip: Use the EFT Listing as a final check before uploading the EFT file to your bank. Confirm the BSB, account number, amount and reference all look correct, and that the Batch Total matches the superannuation amount.
💾 Recommended: Save a copy of the EFT or BPAY Listing (e.g. as a PDF) alongside the Creditor Payment UPDATE report in your pay run records — together they provide a complete audit trail of the superannuation payment.
ℹ️ End of guide. Once the EFT or BPAY file has been generated and verified, the file is ready to be uploaded to your bank in the usual way for your business. Bank upload and payment reconciliation processes vary by bank and are outside the scope of this guide — please follow your organisation's existing procedures for those steps.